![]() | Sam 4x4 | About | 4x4 Vehicles | Accessories |
Executives |
Testimonials |
Mission | Links | Contact |
| Sam 4x4 | About | 4x4 Vehicles | Accessories |
Executives |
Testimonials |
Mission | Links | Contact |
![]()
Toyota Hilux Vigo | Mitsubishi L200 Triton | Nissan Navara | Toyota Fortuner | DMax | Chevy Colorado | Ford Ranger
Thailand 4x4 pickup SUV exporter importer of RHD LHD New 2009 2008 and Used Toyota Vigo, Toyota Fortuner, L200 Triton, and Nissan Navara
Troubleshoot Cooling System
Cooling systems can be your best friend when operating efficiently. Cooling system repairs . . . your worst enemy if you don't understand how your cooling system works.
Your cooling system performs a critical function. Simply put, it maintains proper engine temperature by circulating coolant through the engine to pick up heat and passing it through a radiator to cool it with air. The coolant passes through a thermostat valve to control flow and possibly over a temperature sensor which controls external air cooling fans.
What is a Cooling System
A typical 4 cylinder vehicle cruising along the highway at around 50 miles per hour, will produce 4000 controlled explosions per minute inside the engine as the fuel is ignited in each cylinder to propel the vehicle down the road. Obviously, these explosions produce an enormous amount of heat and, if not controlled, will destroy an engine in a matter of minutes. Controlling these high temperatures is the job of the cooling system.
The modern cooling system has not changed much from the cooling systems in the model T back in the '20s. Oh sure, it has become infinitely more reliable and efficient at doing its job, but the basic cooling system still consists of liquid coolant being pumped by a mechanical water pump through the engine, then out to the radiator to be cooled by the air stream coming through the front grill of the vehicle.
Today's cooling system must maintain the engine at a constant temperature whether the outside air temperature is 110 degrees Fahrenheit or 10 below zero. If the engine temperature is too low, fuel economywill suffer and emissions will rise. If the temperature is allowed to get too hot for too long, the engine will self destruct.
Cooling systems consist of three main parts:
Cooling System Part #1: Pumping
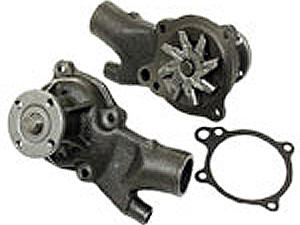 Your cooling system's pumping function is handled by its water
pump, which keeps the coolant mixture moving.
Your cooling system's pumping function is handled by its water
pump, which keeps the coolant mixture moving.
The water pump is made up of a housing, usually made of cast iron or cast aluminum and an impeller mounted on a spinning shaft with a pulley attached to the shaft on the outside of the pump body. A seal keeps fluid from leaking out of the pump housing past the spinning shaft. The impeller uses centrifugal force to draw the coolant in from the lower radiator hose and send it under pressure into the engine block. There is a gasket to seal the water pump to the engine block and prevent the flowing coolant from leaking out where the pump is attached to the block.
The main water pump is gear- or belt-driven but, in many cars, a secondary electric water pump is used for improved flow and cooling.
Critical to the pump's operation is the drive belt that turns it. On most newer cars this is the engine's timing belt. On older cars, the pump and belt are external and run off the main crankshaft pulley with a "V" or flat belt.
Maintenance of cooling system pumping is limited to scheduled coolant replacement and drive-belt replacement and tension adjustment (external type). Timing-belt-driven pumps should always be replaced at the same time as the timing belt and tensioner.
Cooling System Part #2: Piping
Your cooling system's piping consists of all hoses, any control valves, the heater core, the radiator and the expansion tank. Because of the materials used and the constant contact with coolant, all parts in this system deteriorate more from time than use.
Maintenance of cooling system piping consists of scheduled coolant replacement, replacement of all hoses on a regular basis and replacement of any plugged or leaking parts.
All hoses should be checked at least twice a year for abrasions, cracks, flexibility and evidence of leakage. Whenever the coolant is drained for replacement or during engine repairs, any suspect hoses should be replaced. All hoses should be replaced at least every few years.
Radiators, expansion tanks, heater cores and control valves are normally only replaced due to leakage or plugging. The condition of these parts should be assessed by a professional since proper functioning is critical to many other systems within your car.
Cooling System Part #3: Temperature Control
Your cooling system's temperature controls include all coolant temperature sensors, thermostat, radiator or expansion tank cap, cooling fan(s) and fan clutch (if equipped). These cooling system parts function primarily independent of the engine but control the engine either through cooling or by sending control signals to your car's electronic systems.
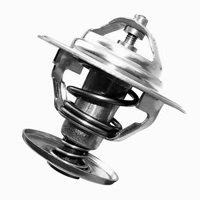 The thermostat is a spring-loaded valve that opens and closes
based on the temperature of the coolant flowing through it. A high
temperature reading followed by a drop to normal temperature (or a
continuously low temperature) is a common first sign of a sticking
thermostat. However, many other conditions may cause these symptoms,
so you need to know how to eliminate each possibility.
The thermostat is a spring-loaded valve that opens and closes
based on the temperature of the coolant flowing through it. A high
temperature reading followed by a drop to normal temperature (or a
continuously low temperature) is a common first sign of a sticking
thermostat. However, many other conditions may cause these symptoms,
so you need to know how to eliminate each possibility.
The radiator or expansion tank cap is also a spring-loaded valve reacting to system pressure. It serves to maintain proper system coolant level at predetermined pressures. It must always be replaced with an exact replacement cap with the same pressure setting. Never use other caps except for short-term emergencies!
A belt-driven fan blade for pulling air through the radiator is usually on the water pump pulley and should have a fan clutch to control it. The fan clutch allows the fan to turn with the belt at low engine speed and "free-wheel" at higher speeds. A bad fan clutch either doesn't allow the fan to spin at low speed (overheating in traffic) or doesn't allow it to free-wheel at high speed (potential overheating on highway or reduced gas mileage).
An electric fan can be either by itself (usually front-wheel drive) or auxiliary (used with a mechanical fan). Both types are controlled via a temperature sensor - in the radiator or upper radiator hose or on the thermostat or water pump housing. This sensor is usually an on/off type switch with a fixed temperature setting. (Some vehicles may have 2-3 settings for multi-speed fans.) This sensor is commonly called an "auxiliary fan switch".
Other common temperature sensors are: 1) gauge sender (variable output); 2) warning light sender (on/off type); 3) lambda and/or fuel injection sensor(s) (variable to control fuel injection settings); 4) thermo-time switch (cold start valve control). Your car may have other sensors as well.
Temperature control is critical to both performance and emission control. Unfortunately, this system is the most difficult to troubleshoot without proper equipment and diagrams. It's even more difficult with computers that adjust timing, idle speed, vacuum and fuel delivery automatically to make up for potentially faulty temperature sensor signals.
Maintenance of your cooling system sensors is virtually impossible since there's nothing really to "maintain". Keeping them clean both internally (coolant replacement) and externally (engine cleaning) is the best way to ensure trouble-free driving. Checking and replacing all parts at the factory-recommended time or mileage limits helps as well.
A Few Important Things to Remember
Heed these cooling system maintenance tips and you're well on your way to ensuring your cooling system won't let you down:
Tip #1: Keep your engine and engine compartment, as well as your radiator fins and grill, as clean as possible. A clean engine runs much cooler - and it's much easier to work on.
Tip #2: Replace coolant at or before factory recommended intervals with the proper type, mixture and volume of coolant. Always allow the coolant system to rid itself of air before installing the radiator cap.
Tip #3: Replace all cooling system hoses - upper and lower radiator hoses, bypass hoses, heater hoses, manifold coolant hoses and any other hoses on your vehicle - whenever you even suspect there may be a problem. All hoses should be replaced at least every two years.
Tip #4: Replace the thermostat with the original temperature setting equivalent. The electronics in your vehicle may use that setting for other controls. Do not substitute under any circumstances.
Tip #5: Replace the radiator/expansion tank cap with the original pressure setting and OE-type equivalent. Some aftermarket substitutions do not seal and hold pressure properly on foreign-manufactured cars. Again, don't substitute.
Tip #6: Adjust or replace the water pump drive belt (external) at recommended intervals or more frequently, if required. Check belts whenever you're working on any coolant system components.
Tip #7: Replace your water pump with an OEM/OES pump at the first signs of trouble or when your timing belt and tensioner are replaced. Watch for signs of overheating - you don't want to break down in the hot sun when your water pump fails.
Tip #8: Replace the fan clutch and/or fan blade as needed (if applicable). Your car's temperature gauge is often your best guide as to when your fan clutch needs attention.
Tip #9: Replace temperature sensors as required by diagnosis. Leave troubleshooting of your sensors to experts who have the proper equipment and diagrams.
Tip #10: Keep your entire vehicle properly maintained because of the effect timing, idle speed, exhaust and other systems have on your engine's temperature. Your car's cooling system is designed to function with all other systems operating properly. It cannot make up for a poorly operating or overheating engine condition.
Cooling System Maintenance and Repair
An engine that is overheating will quickly self destruct, so proper maintenance of the cooling system is very important to the life of the engine and the trouble free operation of the cooling system in general.
The most important maintenance item is to flush and refill the coolant periodically. The reason for this important service is that anti-freeze has a number of additives that are designed to prevent corrosion in the cooling system. This corrosion tends to accelerate when several different types of metal interact with each other. The corrosion causes scale that eventually builds up and begins to clog the thin flat tubes in the radiator and heater core. causing the engine to eventually overheat. The anti-corrosion chemicals in the antifreeze prevents this, but they have a limited life span.
Newer antifreeze formulations will last for 5 years or 150,000 miles before requiring replacement. These antifreezes are usually red in color and are referred to as "Extended Life" or "Long Life" antifreeze. GM has been using this type of coolant in all their vehicles since 1997. The GM product is called "Dex-Cool".
Most antifreeze used in vehicles however, is green in color and should be replaced every two years or 30,000 miles, which ever comes first. You can convert to the new long life coolant, but only if you completely flush out all of the old antifreeze. If any green coolant is allowed to mix with the red coolant, you must revert to the shorter replacement cycle.
Look for a shop that can reverse-flush the cooling system. This requires special equipment and the removal of the thermostat in order to do the job properly. This type of flush is especially important if the old coolant looks brown or has scale or debris floating around in it.
If you remove the thermostat for a reverse flush, always replace it with a new thermostat of the proper temperature. It is cheap insurance.
The National Automotive Radiator Service Association (NARSA) recommends that motorists have a seven-point preventative cooling system maintenance check at least once every two years. The seven-point program is designed to identify any areas that need attention. It consists of:
- a visual inspection of all cooling system components, including belts and hoses
- a radiator pressure cap test to check for the recommended system pressure level
- a thermostat check for proper opening and closing
- a pressure test to identify any external leaks to the cooling system parts; including the radiator, water pump, engine coolant passages, radiator and heater hoses and heater core
- an internal leak test to check for combustion gas leakage into the cooling system
- an engine fan test for proper operation
- a system power flush and refill with car manufacturer's recommended concentration of coolant
Let's take these items one at a time.
Visual Inspection
What you are looking for is the condition of the belts and hoses. The radiator hoses and heater hoses are easily inspected just by opening the hood and looking. You want to be sure that the hoses have no cracking or splitting and that there is no bulging or swelling at the ends. If there is any sign of problems, the hose should be replaced with the correct part number for the year, make and model of the vehicle. Never use a universal hose unless it is an emergency and a proper molded hose is not available.
Heater hoses are usually straight runs and are not molded, so a universal hose is fine to use and often is all that is available. Make sure that you use the proper inside diameter for the hose being replaced. For either the radiator hoses or the heater hoses, make sure that you route the replacement hose in the same way that the original hose was running. Position the hose away from any obstruction that can possibly damage it and always use new hose clamps. After you refill the cooling system with coolant, do a pressure test to make sure that there are no leaks.
On most older vehicles, the water pump is driven by a V belt or serpentine belt on the front of the engine that is also responsible for driving the alternator, power steering pump and air conditioner compressor. These types of belts are easy to inspect and replace if they are worn. You are looking for dry cracking on the inside surface of the belt.
On later vehicles, the water pump is often driven by the timing belt. This belt usually has a specific life expectancy at which time it must be replaced to insure that it does not fail. Since the timing belt is inside the engine and will require partial engine disassembly to inspect, it is very important to replace it at the correct interval. Since the labor to replace this belt can be significant, it is a good idea to replace the water pump at the same time that the belt is replaced. This is because 90 percent of the labor to replace a water pump has already been done to replace the timing belt. It is simply good insurance to replace the pump while everything is apart.
Radiator pressure cap test
A radiator pressure cap is designed to maintain pressure in the cooling system at a certain maximum pressure. If the cooling system exceeds that pressure, a valve in the cap opens to bleed the excessive pressure into the reserve tank. Once the engine has cooled off, a negative pressure begins to develop in the cooling system. When this happens, a second valve in the cap allows the coolant to be siphoned back into the radiator from the reserve tank. If the cap should fail, the engine can easily overheat. A pressure test of the radiator cap is a quick way to tell if the cap is doing its job. It should be able to hold its rated pressure for two minutes. Since radiator caps are quite inexpensive, I would recommend replacing it every 3 years or 36,000 miles, just for added insurance. Make absolutely sure that you replace it with one that is designed for your vehicle.
Thermostat check for proper opening and closing
This step is only necessary if you are having problems with the cooling system.
A thermostat is designed to open at a certain coolant temperature. To test a thermostat while it is still in the engine, start the engine and let it come to normal operating temperature (do not let it overheat). If it takes an unusually long time for the engine to warm up or for the heater to begin delivering hot air, the thermostat may be stuck in the open position. If the engine does warm up, shut it off and look for the two radiator hoses. These are the two large hoses that go from the engine to the radiator. Feel them carefully (they could be very hot). If one hose is hot and the other is cold, the thermostat may be stuck closed.
If you are having problems and suspect the thermostat, remove it and place it in a pot of water. Bring the water to a boil and watch the thermostat. You should see it open when the water reaches a boil. Most thermostats open at about 195 degrees Fahrenheit. An oven thermometer in the water should confirm that the thermostat is working properly.
Pressure test to identify any external leaks
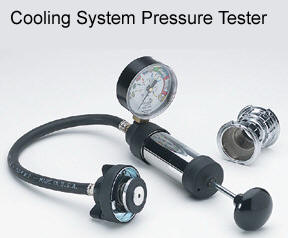 Pressure
testing the cooling system is a simple process to determine where a
leak is located. This test is only performed after the cooling
system has cooled sufficiently to allow you to safely remove the
pressure cap. Once you are sure that the cooling system is
full of coolant, a cooling system pressure tester is attached in
place of the radiator cap. The tester is than pumped to build
up pressure in the system. There is a gauge on the tester
indicating how much pressure is being pumped. You should pump
it to the pressure indicated on the pressure cap or to
manufacturer's specs.
Pressure
testing the cooling system is a simple process to determine where a
leak is located. This test is only performed after the cooling
system has cooled sufficiently to allow you to safely remove the
pressure cap. Once you are sure that the cooling system is
full of coolant, a cooling system pressure tester is attached in
place of the radiator cap. The tester is than pumped to build
up pressure in the system. There is a gauge on the tester
indicating how much pressure is being pumped. You should pump
it to the pressure indicated on the pressure cap or to
manufacturer's specs.
Once pressure is applied, you can begin to look for leaks. Also watch the gauge on the tester to see if it loses pressure. If the pressure drops more than a couple of pounds in two minutes, there is likely a leak somewhere that may be hidden. It is not always easy to see where a leak is originating from. It is best to have the vehicle up on a lift so you can look over everything with a shop light or flashlight. If the heater core in leaking, it may not be visible since the core is enclosed and not visible without major disassembly, but one sure sign is the unmistakable odor of antifreeze inside the car. You may also notice the windshield steaming up with an oily residue.
Internal leak test
If you are losing coolant, but there are no signs of leaks, you could have a blown head gasket. The best way to test for this problem is with a combustion leak test on the radiator. This is accomplished using a block tester. This is a kit that performs a chemical test on the vapors in the radiator. Blue tester fluid is added to the plastic container on the tester. If the fluid turns yellow during the test, then exhaust gasses are present in the radiator.
The most common causes for exhaust gasses to be present in the radiator is a blown head gasket. Replacing a bad head gasket requires a major disassembly of the engine and can be quite expensive. Other causes include a cracked head or a cracked block, both are even more undesirable than having to replace a head gasket.
When a head gasket goes bad
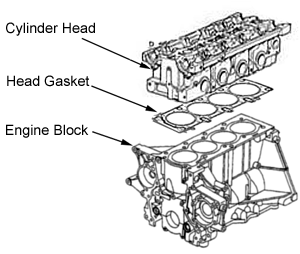 The process of replacing a head gasket begins with
completely draining the coolant from the engine. The best part
of the engine is then disassembled along with much of the front of
the engine in order to gain access to the cylinder heads. The
head or heads are then removed and a thorough inspection for
additional damage is done.
The process of replacing a head gasket begins with
completely draining the coolant from the engine. The best part
of the engine is then disassembled along with much of the front of
the engine in order to gain access to the cylinder heads. The
head or heads are then removed and a thorough inspection for
additional damage is done.
Before the engine can be reassembled, the mating surfaces of the head and block are first cleaned to make sure that nothing will interfere with the sealing properties of the gasket. The surface of the cylinder head is also checked for flatness and, in some cases, the block is checked as well. The head gasket is then positioned on the block and aligned using locator pegs that are built into the block. The head is then placed on best of the gasket and a number of bolts, called head-bolts are coated with oil and loosely threaded into the assembly. The bolts are then tightened in a specific order to a specified initial torque using a special wrench called a torque wrench. This is to insure that the head gasket is crushed evenly in order to insure a tight seal. This process is then repeated to a second, tighter torque setting, then finally a third torque setting. At this point, the rest of the engine is reassembled and the cooling system is filled with a mixture of antifreeze and water. Once the engine is filled, the technician will pressure test the cooling system to make sure there are no leaks.
In many engines, coolant also passes between the heads and the intake manifold. There are also gaskets for the intake manifold to keep the coolant from leaking out at that point. Replacing an intake manifold gasket is a much easier job than a head gasket, but can still take a couple of hours or more for that job.
Engine Fan Test
The radiator cooling fan is an important part of the cooling system operation. While a fan is not really needed while a vehicle is traveling down the highway, it is extremely important when driving slowly or stopped with the engine running. In the past, the fan was attached to the engine and was driven by the fan belt. The speed of the fan was directly proportional to the speed of the engine. This type of system sometimes caused excessive noise as the car accelerated through the gears. As the engine sped up, a rushing fan noise could be heard. To quiet things down and place less of a drag in the engine, a viscous fan drive was developed in order to disengage the fan when it was not needed.
When computer controls came into being, these engine driven fans gave way to electric fans that were mounted directly on the radiator. A temperature sensor determined when the engine was beginning to run too hot and turned on the fan to draw air through the radiator to cool the engine. On many cars, there were two fans mounted side by side to make sure that the radiator had a uniform air flow for the width of the unit.
When the car was in motion, the speed of the air entering the grill was sufficient to keep the coolant at the proper temperature, so the fans were shut off. When the vehicle came to a stop, there was no natural air flow, so the fan would come on as soon as the engine reached a certain temperature.
If the air conditioner was turned on, a different circuit would come into play. The reason for this is the air conditioning system always requires a good air flow through the condenser mounted in front of the radiator. If the air flow stopped, the air conditioned air coming through the dash outlets would immediately start warming up. For this reason, when the air conditioner is turned on, the fan circuit would power the fans regardless of engine temperature.
If you notice that the engine temperature begins rising soon after the vehicle comes to a stop, the first thing to check is fan operation. If the fan is not turning when the engine is hot, a simple test is to turn the AC on. If the fan begins to work, suspect the temperature sensor in the fan circuit (you will need a wiring diagram for your vehicle to find it). In order to test the fan motor itself, unplug the two wire connector to the fan and connect a 12 volt source to one terminal and ground the other. (it doesn't matter which is which for this test) If the fan motor begins to turn, the motor is good. If it doesn't turn, the motor is bad and must be replaced.
In order to test the system further, you will need a repair manual for the year, make and model vehicle and follow the troubleshooting charts and diagnostic procedures for your vehicle. On most systems, there will be a fan relay or fan control module that can be a trouble spot. There are a number of different control systems, each requiring a different test procedure. Without the proper repair information, you can easily do more harm than good.
Cooling system power flush and refill
While you can replace old coolant by draining it out and replacing it with fresh coolant, the best way to properly maintain your cooling system is to have the system power flushed. Power flushing will remove all the old coolant and pull out any sediment and scale along with it.
Power flushing requires a special machine that many auto repair shops have for the purpose. The procedure requires that the thermostat is removed, the lower radiator hose is disconnected, and the flush machine is connected in line. The lower hose is connected to the machine and the other hose from the machine is connected to the radiator where the lower hose was disconnected from.
Water, and sometimes, a cleaning agent is pumped through the cooling system in a reverse path from the normal coolant flow. This allows any scale to be loosened and flow out. Once clear water is coming out of the system, the hose is reconnected and a new thermostat is installed. Then the cooling system is refilled with the appropriate amount of antifreeze to bring the coolant to the proper mixture of antifreeze and water. For most vehicles and most climates, the mixture is 50 percent antifreeze and 50 percent water. In colder climates, more antifreeze is used, but must never exceed 75 percent antifreeze. Check your owner's manual for the proper procedures and recommendations for your vehicle.
Your Cooling System Parts Shopping List
Here's a list of cooling system repair parts you should consider when repairing your car's cooling system:
- Coolant -
- Water Pump -
- Water Pump Drive Belt (timing, V-, or flat) -
- Hoses (upper & lower radiator, bypass, heater, manifold coolant, etc.) -
- Radiator -
- Expansion Tank -
- Heater Core -
- Control Valves -
- Temperature Sensors, as applicable* -
- Radiator Cap and/or Expansion Tank Cap -
- Fan Clutch -
*auxilliary fan switch, gauge sender, warning light sender, lambda, fuel injection, thermo-time switch, etc.
 |
 |
 |
| Return to our page on Automotive Articles | Return to Index Page | Email us now at thai4x4@gmail.com |
FYI, Per Statcounter
you are the
-th visitor to our site since the beginning of
this year.
© 2002-2009 :: Sam Automotive Group :: All rights reserved :: Email: thai4x4@gmail.com ::