![]() | Sam 4x4 | About | 4x4 Vehicles | Accessories |
Executives |
Testimonials |
Mission | Links | Contact |
| Sam 4x4 | About | 4x4 Vehicles | Accessories |
Executives |
Testimonials |
Mission | Links | Contact |
![]()
Toyota Hilux Vigo | Mitsubishi L200 Triton | Nissan Navara | Toyota Fortuner | DMax | Chevy Colorado | Ford Ranger
Thailand 4x4 pickup SUV exporter importer of RHD LHD New 2009 2008 and Used Toyota Vigo, Toyota Fortuner, L200 Triton, and Nissan Navara
How to keep your car interior shining
Contents
- Detail your vehicle
- Detailing the Interior Step by Step
- Cleaning and detailing the interior
- How to remove stains
- Repairing seats and dash
- Repairing door panels
- Keeping the interior clean
Keeping interior of our car clean and fresh is the key to continue enjoying it. Here are some great tips on keeping the interior of your car in the best possible state.
We all love that "new car" feeling and would love to keep the interior clean and protected. Dirt is your enemy, if you don't let it accumulate it on your car interior you have won half the war. Dirt grounding into your carpeting and seats gradually wears them out. Keep the seats clean and the rugs vacuumed on a regular basis.
![]() These tips are provided for your convenience. They work
for us but may not work for you so use your discretion. We may NOT be
held responsible for any personal injuries or any damages to the
property as a result of applied suggestions. Please read all safety
information provided on products which will be used to prevent any
accidents and injuries. If you have any questions regarding cleaning
your car interior or have a great tip to add and would like it to be
published on our website, please e-mail us at thai4x4@gmail.com.
These tips are provided for your convenience. They work
for us but may not work for you so use your discretion. We may NOT be
held responsible for any personal injuries or any damages to the
property as a result of applied suggestions. Please read all safety
information provided on products which will be used to prevent any
accidents and injuries. If you have any questions regarding cleaning
your car interior or have a great tip to add and would like it to be
published on our website, please e-mail us at thai4x4@gmail.com.
Detail your 4x4 not just clean it
Most 4x4 owners do clean their vehicles's exterior and interior quite well but if the vehicle is sent to a professional detailer one can tell the difference so what is the secret to professional detailers difference. It is their attention to detail! Detailer aims to restore a vehicle's interior to its showroom condition and appearance as much as possible. Detailing is minute, painstaking, time-consuming attention to details. It is zero tolerance to dirt and grime? You don't just clean the dust that is apparent but also that is hidden. You don't just clean the dirt in the upholstery but also its seam crevices. You don't just clean the front of the steering wheel but also its sides and bottom begrimed by sweaty hands? Attention to details also means uncluttering the vehicle from anything that is unnecessary.
 Vehicle carpeting is shampooed much as is your home's carpeting,
but more intensively. Vehicle upholstery -whether vinyl, fabric, or
leather-is cleaned of stains using methods and products similar to
(or the same as) those used on upholstered furniture, but with
greater attention to detail. What cleans your home's windows cleans
your vehicle's, but windows and windshield (as well as sunroofs)
need more frequent and more careful cleaning. For example, a vehicle
with finely finished wood molding can be detailed with the same
polish used to protect and brighten fine furniture, but special
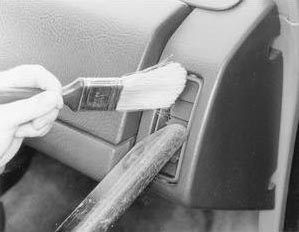
attention must be given to crevices and contours. In the picture on the left, detailer brushes dirt from a vent directly into the waiting vacuum crevice tool. This is the kind of dirt enmity that defines a detailer from just a cleaner.
Vehicle carpeting is shampooed much as is your home's carpeting,
but more intensively. Vehicle upholstery -whether vinyl, fabric, or
leather-is cleaned of stains using methods and products similar to
(or the same as) those used on upholstered furniture, but with
greater attention to detail. What cleans your home's windows cleans
your vehicle's, but windows and windshield (as well as sunroofs)
need more frequent and more careful cleaning. For example, a vehicle
with finely finished wood molding can be detailed with the same
polish used to protect and brighten fine furniture, but special
attention must be given to crevices and contours. In the picture on the left, detailer brushes dirt from a vent directly into the waiting vacuum crevice tool. This is the kind of dirt enmity that defines a detailer from just a cleaner.
The major difference between a vehicle's interior and your home's is use intensity. Because your vehicle interior is used intensively and subjected to all the abuses that the word intensity implies, its detailing must also be intensive, routine "housecleaning" won't suffice.
Consider the facts. Depending on your life-style and how much time you spend at home, you may only occasionally use your living room's sofa or any particular upholstered chair. However, driver seat upholstery may be used and unavoidably abused half the hours- and more-of every day. Vehicle carpeting, unlike most home carpeting, is often continuously "tracked"-with dirt, oil, grease, snow and slush. Whereas home carpeting is seldom systematically worn in any one small spot, a driver's right heel, forever nudging the accelerator, first dirties and then sometimes wears through a particular place in vehicle carpeting (unless that particular place is protected by a car mat).
In its lifetime, moreover, your vehicle's interior may become a bedroom (for a quick snooze at a highway rest area), a restaurant, an office, a sick bay, a storeroom, a moving van-you name it.
And all of this use and abuse occurs literally under glass and within the relatively tiny confines of the average vehicle. Use of a home may be spread over 1200- 5000 square feet, or more. A vehicle's interior use takes place in seldom more than 45 square feet. And, in some downsized models, less than half that.
Moreover, unlike your home's carpets and upholstered furniture, or even windows, a vehicle's interior is subjected to extremes of heat, cold, and sunlight. Daily it is exposed to atmospheric pollutants, road grime and contamination from its own and other engines. Even a tightly closed vehicle interior cannot escape all of these natural and natural extremes.
Detailing the interior step by step
There is no one "right way" to super-detail your vehicle's interior. But a systematic, orderly way is outlined below:
Carpeting and Fabric Upholstery
- Vacuum
- Shampoo
- Rinse
- Dry
- Protect (optional)
Vinyl Upholstery
- Vacuum
- Clean
- Protect
Leather Upholstery
- Vacuum
- Clean
- Condition/protect
Dashboard, Moldings and Trim (Plastic, Vinyl or Rubber)
- Clean
- Restore
- Protect
Interior Metal, Including Chrome
- Clean
- Polish
Windshield, Windows and Mirrors
- Clean
- Protect (optional)
You can detail the interior piecemeal -- say, do the carpeting and upholstery one day, the rest of the interior another-or get it done with one effort.
Doing it in a single shot usually means you'll need to do all of the interior molding, chrome, the dash, windshield, and windows first, before you do the upholstery, because upholstery that seems to have dried requires several hours, or even overnight, to dry thoroughly. Since you don't want to sit on a wet or damp seat while doing the dash, windows, ceiling (headliner), and other interior detailing, it makes sense to do those jobs first.
Cleaning your wood or carbon fiber trim
Use only a soft cloth, like a cotton baby diaper (unused one please ;)), and water or Windex to clean the high gloss wood trim surface. Spray the Windex to the cloth first. Do not spray it directly to the surface of the trim. For stubborn stains you may use car wax
Getting rid of the bad smell
Buy a pack of baking soda and transfer contents into the container that will prevent powder from spilling. Or you can simply open the baking soda pack and throw about a half of it away, this way the pack will be half empty and more secure. Place the container somewhere in the car so that it will not move around - between the seats is a good place. Just forget about it for several weeks and let the baking soda absorb any unwanted smell that is currently in your car interior. Then just throw away the container and, please, don't try to smell it. To keep your car smelling fresh put a pouch of ground coffee beans under the seat.
There are also many products that make your car interior smell wonderful and you can change them to suit your mood.
Keeping your leather interior sparkling clean
Apply the leather cleaner of your choice one section at a time and work the solution into a nice lather. If your leather is heavily soiled, use an upholstery (interior detailing) brush. When finished be sure to remove all soap from the surface with a damp towel. Rinse and wipe several times, then dry the leather with a fresh, dry towel. By the way, water will not hurt your leather. Most leather is actually made (tanned) in water. To condition your leather and prevent it from cracking, apply the leather conditioner of your choice on one section at a time using a soft a foam wax applicator. Work the conditioner in thoroughly. Allow the conditioner to sit (soak in) for a few minutes, then buff off the excess with a dry terry cloth towel. It’s important to buff off the excess. If you allow the excess to stay, your seats will be slippery. After a few minutes of soak time, your leather has taken in all the moisture it can. The remainder will simply evaporate, leaving that milky cloud on the inside of your windows.
Cleaning your carpets
Remove the floor mats, the front carpets, and the foam pads under the carpets. On the convertibles, these foam pads can get wet due to leaks in the top, and they can take on a musty odor that smells awful. Whether coupe or convertible, a good airing out in the sun for an afternoon (on both sides) will make them smell better. A little baking soda sprinkled on and vacuumed off will help to soak up bad odors. These foam mats are like odor-eaters in your shoes. They can get smelly, so take some time with them. If they are really deteriorating rotted, or falling apart, order new ones. A home supply store or carpet shop may have suitable foam replacement, but it should be of the same quality, thickness and density of the original. Don't forget to wipe down the paint on the floor boards too. If you have mats over your carpets, hopefully your carpets are in good shape. Start by thoroughly vacuuming them. Use a household upright vacuum cleaner, not the nozzle type like at the car wash. Lay the carpeting on a flat clean surface and go over it for several minutes with the vacuum.
Wait, you're still not done! Pick the carpets up and beat them against a chain link fence (preferable) or a brick wall or other flat object. There is a lot of embedded dirt in these carpets! Keep beating until you don't see copious amounts of dirt and dust flying out of them - then vacuum again. Hang them up on a clothes-line to air out in the sunshine. If they smell, a little baking powder sprinkled generously on them will also soak up most of the odors. Of course, vacuum the powder off before putting back in the car.
Floor mats come in many varieties: carpet, rubber, or soft pile.
All of these respond well to the beat-against-a-chain-link-fence
method, and all except the rubber mats benefit from the same
vacuuming treatment. You can wash and hose down rubber mats. Both
the mats and carpets may have stains on them. If you want to really
clean these well, then rent a professional steam cleaning system.
Most of these are safe to the carpet color and texture, and they do
a good job of pulling out even more unbelievable amounts of grey-gunky
stuff. You'll need to let these air for at least one day in the sun
to dry them thoroughly. Don't put non-dry carpets or mats back into
the car. You could also use a spray-on carpet cleaner. Woolite
(brand) Spray Carpet Cleaner is pretty good if it is available in
your country. It's mild enough not to bleach color out of the
carpet/mats, but strong enough to most surface stains. Always follow
the directions on whatever you buy to a "T" . Try it on an
inconspicuous piece, so if it messes it up, you can hide it. Err on
the side of caution.
Cleaning the panels Seats, Dashboard and Interior Panels
If your home vacuum cleaner has one of those round soft bristle attachments, run it over the surfaces of the seats (especially in those crevices!) Also run it along the door panels, rear deck window ledge, along the best of the dashboard, around the instrument cluster, the steering wheel yoke, and especially into the dashboard ventilation nozzles. Don't forget the interior side panels and the storage bins in the doors. This is an important step to pick up the big surface dust before we start using any cleaners on the interior surfaces. If you leave out this step, you'll actually wash the dirt more into these surfaces. Not good!
Cleaning your rubber parts Rubber trim pieces and door jams
There are small rubber pieces in the interior, notably by the windows and the foot pedals. Use the Snap (brand) Silicone Tire Shine. Use a Q-tip or your finger wrapped around a terry cloth towel and wipe these crevices several times - they will shine up beautifully, promise! Little details like this really set off cleaning from detailing. You can clean without detailing, but you can not detail without cleaning. Spray the rubber around the door jams and wipe down. Then do it again. This rubber does have a tendency to rot or tare if not taken care of. The door jams can be shined with Maguires Cleaner Wax.
Cleaning the air vents
Take some window cleaner and Q-tips, and clean out the vents on the dash. A quick shot of silicone spray and a wipe down with a lint free towel will make them look better than new.
Details of Detailing
Vacuuming
Any good home vacuum with a plastic (not metal) crevice attachment works well. Portable vacuums, despite their popularity and increased power, generally lack the power to vacuum vehicle carpets as they should be vacuumed. Vacuums at the coin-op places may have power enough, but the clamor of other vehicle owners to use the vacuum you're using, plus the need to keep feeding the meter, often discourages a thorough job.
- Start with the upholstery. Using the attachment usually used for drapes or window blinds, vacuum seat backs and seats. Push seats forward to get behind and beneath them. On rear seats, don't neglect seat fronts, the back edge of seats facing the rear window, and around armrests.
- Switch to the plastic crevice tool (plastic rather than metal which, if bent or sharp, risks tearing the fabric, vinyl or leather, or cutting stitching). The crevice tool is for getting deep into upholstery seams and pleats. With one hand working ahead of the tool, spread the upholstery's seams; with the other hand, work the crevice tool into the seams. Seams collect a lot of dirt, so you may have to go over them several times.
- Now vacuum the carpets. Use the drape and blind attachment to vacuum rear carpeting. Unless you have a van, wagon, or motor home, rear carpeting isn't extensive.
- Move to the front carpeting (under and ahead of seats). Move the seats forward and then backward, to their full forward or rear positions to get under them. This is probably the dirtiest carpeting area in any vehicle. The next dirtiest is the carpeting in front of the driver's seat.
- With the palm of your hand or a brush, beat the carpeting just ahead of your vacuum tool. Carpet beating dislodges deep-down dirt and brings it to the surface for vacuuming.
- With the crevice tool, get into crevices of the seat's floor tracks; all around the perimeter of the carpeting, front and back; and especially in the driver's foot area (around the pedals and dimmer switch, if it's located on the floor).
- Use the crevice tool to vacuum the instrument panel, floor console, and around the windows and windshield molding, especially where the windshield meets the dash. If the crevice tool won't squeeze into this often small but particularly dirty area, use a "detail stick": a 1/8 or ¼ inch-diameter length of wood doweling wrapped in a clean piece of cloth or cheesecloth.
- Finally, use the drape and blind attachment to gently vacuum the headliner. The headliner is fragile, so exert minimum pressure on it to avoid damage.
Detailing Fabric Upholstery
You have several methods and product choices as described below. The first two methods are outlined on the following pages.
- Shampoo fabric upholstery (including cloth, velour, sheepskin, or combination vinyl/fabric upholstery) with a good sudsy household wash product. Some of the choices are:
- A sudsy solution made with liquid hand soap; any good neutral soap and water; a soap made for hand-washing delicate fabrics; fabric and rug shampoos shelved in supermarkets; car-maker upholstery shampoos available from the dealer from whom you bought your vehicle.
- Use a spray-on/wipe-off fabric cleaner
- Hire others to clean it. Arrange to bring your vehicle into the shop of any reputable home carpet/upholstery cleaner. For a usually small fee, someone there will use the shop's heavy-duty equipment to clean your vehicle's upholstery and carpet and to extract the rinse water so as to speed the drying process.
Vehicle cloth is the most difficult type of upholstery material to keep clean or to clean after it becomes dirty or stained. That's one reason pro-detailers usually charge more to clean the interior of a fabric-upholstered vehicle.
Shampooing fabric upholstery
If there's any secret to shampooing a vehicle's upholstery (or, for that matter, vehicle carpeting) it's rinsing. Rinse water must be sucked from upholstery and carpets with a home shop wet-dry vacuum, a carpet wet-dry machine rented from a local supermarket, an extractor, or a vacuum available at coin-op car wash places. Whatever the fabric cleaner -- name-brand or no-name generic -- test it first. Try it on a small area of the fabric that normally isn't in view, If what's happening doesn't look right (you detect fading, or a tint of fabric color shows on your cloth), sbest right there. Let things dry. Then test another fabric cleaner on another spot.
- Remove any spots or stains
- With a soft-bristled brush, gently, but firmly scrub the seats and seatbacks with a circular motion . Get into seams and crevices with the same brush or a toothbrush.
- Wipe away suds with a damp cloth or sponge.
- Rinse with clean water. Use as little water as necessary to rinse thoroughly.
- Extract rinse water with a wet-dry vacuum. Or use paper towels and a hair dryer to speed dry the fabric. To avoid scorching, be careful not to hold the dryer too close to the fabric.
- Allow to dry overnight.
Using spray-on / wipe-off fabric cleaner
![]()
Always read a product label and heed the maker's advice. Some
spray-on vehicle carpet protectors warn: "Keep small children and
pets off carpet until thoroughly dry."
The steps listed below are for a specific product that is typical of the spray-on/wipe-off cleaners. Follow manufacturer's instructions for the product you select.
- Test for colorfastness by cleaning a small, inconspicuous fabric area. Allow to dry. Do not use if color or texture is adversely affected.
- Shake can vigorously. Hold the spray nozzle 4-6 inches from the fabric. Spray a thin, even layer of foam over a small area. Use a cloth or sponge to remove overspray from adjacent, non-upholstered areas.
- With a clean, damp sponge, work foam into the upholstery with overlapping, circular strokes. Rinse sponge clean and squeeze dry frequently.
- Repeat procedure on a small area at a time until entire upholstery is cleaned and protected. Depending on the product, special stain protection may remain after cleaning. It acts to prevent further soiling and stains and helps to maintain the original repellency of upholstery treated with a stain repellent.
- When upholstery is thoroughly dry, vacuum
Detailing Vinyl Upholstery
Vinyl is the easiest vehicle upholstery to clean, but it is not necessarily the easiest to keep clean. Vinyl collects grime faster than other upholsteries do (you can actually feel the grime). And vinyl, despite claims to the contrary, fades noticeably, especially when subjected to intense sun exposure-as the rear seatback, for one example.
There's really no reason to buy a vinyl product that just cleans, when soap and water-or any of many all-purpose household detergents and cleaners-will do just as well. But, unless you're very careful to rinse the vinyl well and then wipe it dry, soap and some other household cleaners can dull or streak vinyl. Special vinyl cleaners-and they abound-do more than merely clean: most also impart a sheen to vinyl.
- Optional wash. Using a clean, damp cloth, thoroughly wash vinyl with a mild household detergent or cleaning formula. Some choices: ammonia and water (4-6 tablespoons of ammonia to 1 quart of water); or dishwashing detergent and water.
- Work the solution into seams, seatbacks, along seat, and backrest edges. Use a toothbrush to reach hard-to-reach places.
- Rinse with clean water. Buff dry with a clean cloth. Allow to dry completely, at least one hour, depending on the weather.
- Apply a good vinyl cleaner or a combination cleaner protectant. Let it work for a few minutes, then rub dry with a clean cloth. The object is to bring up vinyl's natural sheen.
- Finally, if you applied a vinyl cleaner, conclude with a straight protectant. Protectants restore vinyl's original color and sheen. Apply with a clean cloth. Let the formula work a few minutes, then buff dry.
Restoring sun-faded vinyl
A good protectant can sometimes restore nearly original color and sheen to even extremely sun-faded vinyl.
- Apply the protectant with a cloth and a toothbrush and let it work and penetrate overnight. Next morning, rub and buff off any excess.
- If restoration is not complete, repeat the process. Three applications and three overnight soak-ins may be necessary -- but the results can be amazing.
- For worst-case sun-faded vinyl upholstery, you may have to repeat the treatment every 3-4 months in summer, less frequently during less sunny seasons.
Detailing leather upholstery
Leather is much different from other upholstery materials. If your upholstery is genuine hide, it is perishable. Neglected, it will harden, crack, fade, and, in time, deteriorate into a rash of sand like granules that fall off at the mere brush of an arm. Detailing ensures that your costly leather upholstery will retain its resiliency … and its life.
There are several products available for cleaning and preserving leather. Saddle soap, once the conventional cleaner for leather, is seldom used today by pro-detailers. And, yes, some Owner's Manuals still advise doing nothing but wiping leather with a damp cloth, then thoroughly drying. Before applying any product to leather, test it. Many foreign leathers are topically dyed, meaning they aren't dyed completely through the hide. Non-compatible products will "pull dye"-that is, dye comes off on your cleaning cloth.
On the other hand, many late model American vehicle leathers are coated with a protective plastic. The plastic, usually a PolyVinylChloride (PVC), prevents penetration of any of the various leather cleaners and conditioners. Treat vinyl-coated leather exactly as you'd treat vinyl upholstery. As for leather cleaners/conditioners so essential for "raw," uncoated leather? Forget them. They can't get through the protective plastic barrier.
To test whether your leather upholstery is "raw" or plastic-coated, apply a few drops of clean water to the leather. If the water is easily and quickly absorbed, the leather is uncoated; if the droplets aren't absorbed, the leather probably has a protective coating.
The steps listed below are for a specific brand of leather cleaner and conditioner. Follow manufacturer's instructions on the product you select.
- With a soft cloth, apply the cleaner in overlapping strokes.
- Use a soft-bristled toothbrush to work it into seams and crevices. A cleaner's foaming action (use enough cleaner for sufficient foaming) loosens embedded dirt, "floats" dirt from crevices, and cleans the leather.
- Rinse with clean water and a soft cloth or sponge.
- While the leather is still damp, apply the conditioner evenly over the entire surface and into crevices and seams. Wipe off excess conditioner with a soft, clean cloth. The conditioner lubricates and restores the leather's suppleness and its rich, natural luster.
- Allow to dry thoroughly before use.
Detailing vehicle carpeting
What cleans the carpets in your home will clean the carpets in your vehicle. The same spot removers that "de-spot" your home's carpeting will de-spot your vehicle's. Carpet-wash solutions sold for supermarket rental carpet cleaning machines generally do an equally good job on your vehicle's carpeting. Cold-water home fabric wash products are also popular with pro-detailers for cleaning both wool and synthetic vehicle carpeting.
Most common household carpet cleaners tend to be "wet formulas." Even when a wet-dry vacuum or extractor is used to pull out most of the water, carpets are still pretty wet and may need several days to thoroughly air dry. Spray-on vehicle carpet formulas do a credible cleaning job without undo wetness.
Removing road-salt stains
After vacuuming, but before cleaning and washing carpets, remove any spots or stains. Unlike vehicle upholstery, however, carpet is often tracked with road-salted snow and slush, which not only whiten or gray the carpeting but also stain upon melting. A simple procedure and homemade antidote often rids vehicle carpeting of road-salt stains.
- Brush away snow and slush. Vacuum remaining residue.
- If stain remains, remove with a carefully applied saltwater solution: 1 cup of table salt to 1 quart of water.
- Use a soft-bristled brush or cloth to work the salt solution into the stain place. Feather outward from stain's center to avoid leaving a ring in the carpeting.
- With stain removed, shampoo the stain area and adjacent carpeting.
Carpet cleaning with a ‘wet formula’
- Clean the dirtier front-seat carpeting first. If your "wet formula" wash solution becomes dirty, mix a new solution before cleaning the backseat carpeting.
- Apply generous amounts of a "wet formula" with a soft-bristled brush. Use vigorous, circular, overlapping strokes.
- Work the brush and suds deep into the piling.
- With a dry, absorbent cloth or paper towels, wipe off any excess.
- Rinse well and deeply with clean cool or cold water.
- Soak up the rinse water with paper towels. Or, far better, remove with an extractor or a wet-dry home shop vacuum. Or drive to a coin-op place and use its wet-dry vacuum.
- Let dry overnight. When nearly or completely dry, fluff carpet's nap with a dry, soft-bristled brush.
Carpet cleaning with a spray-on formula
- Apply spray-on cleaner as outlined step-by-step in the "wet formula" procedure, for spray-on upholstery cleaning.
- Although some spray-on carpet cleaners may also help to protect newly cleaned vehicle carpets from quickly resoiling, a product designed specifically as a protector gives double protection.
Applying carpet protection
The steps listed below are for a specific brand of protector. Follow the manufacturer's instructions on the protector you select.
- First, test colorfastness. Spray a small amount on a hid den area of carpeting. Wipe with a clean white cloth. If any color shows on the cloth, do not use the product. If no color rub-off shows, proceed.
- Shake the spray can vigorously. Hold can 4-6 inches from the carpet and make circular, overlapping passes. Spray an even, light coating over the entire carpet area.
- Protector will foam. The foam will disappear within a few minutes. Wipe any overspray from adjacent, non-carpet areas.
- Let dry. Protector usually completely dries within about 2 hours.
- If, after the carpet is dry, any whitish residue remains (evidence that in places you applied too much protector), vacuum that area clean.
Cleaning and shining dashboard, instrument panel, and in-vehicle vinyl, plastic and rubber
The detailing cure-all for restoring the original good looks and sheen of vinyl, rubber and plastics is a protectant. Protectant is wiped on, allowed to work for anywhere from a few minutes to overnight (in the case of badly sun-faded vinyl upholstery), and then wiped and buffed off.
Many driveway detailers, however, neglect one vital first step: cleaning. A protectant cannot work its considerable restorative wonders unless the surface to which it is applied is clean.
Protectant pre-cleaning
Whether restoring the dashboard, door moldings, shift console, rubber weather stripping, headrests, sun visors or other in-vehicle appendage, clean the surface before applying protectant. You can use an all-purpose cleaner (such as a dishwashing detergent solution, a weak ammonia-water wash, or any of numerous brand name general-purpose cleaners) and soft cloths to thoroughly wash and dry the surface on which you intend to use a protectant. Or you can apply a pre-protectant rub-on/wipe-off cleaner.
Applying protectant
![]() Since protectants tend to make surfaces slick, do not use on foot
pedal rubber (as the brake or accelerator pedals) or on the steering
wheel.
Since protectants tend to make surfaces slick, do not use on foot
pedal rubber (as the brake or accelerator pedals) or on the steering
wheel.
The same protectants that restore vinyl upholstery can restore other in-vehicle plastic, rubber and composite materials. Protectants do more than simply restore original color. They keep rubber moldings flexible and functioning, protect vinyl from scuffing, and reduce sun-fade.
Protectants need periodic reapplication. To apply, spray or wipe protectant on surface; let it work, then wipe off and buff to a sheen. Most protectants perform better when left on a surface for awhile (for anywhere from a few minutes to several hours), rather than being wiped off immediately.
Detailing interior windows, windshield and mirrors
For windows, windshield and mirrors, use any good glass cleaner or a weak solution of ammonia and water. Treat interior convertible windows as you did their exteriors, with a scratch-removing plastic cleaner/polish.
Reaching the hard-to-reach places
To access the hard-to-reach places in the vehicle interior, use a vacuum's crevice tool, a "detail stick," or a thin, long-handled paint brush. Often dust and dirt can be dislodged with a few zaps of air pressure from an aerosol can of one of the pressurized air products used to rid precision instruments, including camera innards, of dust.
Cleaning and polishing interior chrome
Any good chrome cleaner/polish used to clean and polish exterior chrome can be used to clean and polish interior chrome, as well. However, the interior application and polishing must be done far more carefully to avoid getting chrome cleaner on upholstery or other interior materials to which chrome trim and strips may be attached. Quick application of masking tape eliminates the risk.
- Mask what you intend to polish, if masking is applicable.
- Apply chrome polish with a soft cloth.
- Work polish into chromed crevices and channels.
- Wipe off and buff with a clean soft cloth.
Care and detailing of aftermarket-tinted windows
If you had your vehicle's windows tinted after you bought the vehicle ("aftermarket-tinted") to reduce glare, reduce ultraviolet fading of upholstery, lessen the work load of air conditioning, or provide privacy, disregard everything this chapter says about the routine way to detail plain glass windows. Yours aren't plain glass. Because their interior sides are coated with a sunscreening film, their detailing may require something more than routine doing.
How much more depends on the kind of film the tinter used. Older-type films are particularly vulnerable to scratching unless you use great care and, most important, a super-soft non-abrasive cleaning cloth, Technology has greatly improved the durability and toughness of the newer tint films. The new films can be safely cleaned much as you would clean your vehicle's untinted glass. If in doubt as to whether your windows are tinted with older-or newer-type film, clean them as though they were the older, more scratch-prone type. If you detail windows tinted with the older-type film as though they were ordinary plain glass, you can destroy the special film with a single cleaning.
Windows tinted after delivery from the factory have a thin layer of tinted plastic film on their in-vehicle surfaces. The film, old or new, is vulnerable to grime (the film's chief enemy), scratches, the mechanical action of a window's mechanism (which can cut, scratch, and groove the tint film), and everyday use.
Detailing window tint films of the older type requires a gentle approach. The number-one rule: Never use a cleaning solution that contains ammonia. To clean, use a mild dishwashing detergent solution: 1 ounce of biodegradable, no-color dishwashing detergent mixed with 20 ounces of distilled water. Use a spray bottle to apply the mix. Spraying, which eliminates application or wiping with cloths, reduces abrasive contact with the film. No-color dishwashing detergent won't cloud or discolor the tint; some colored detergents may.
After spraying solution on the tint film, dry the film with an extremely soft and pliable squeegee, or with a soft sponge. If you have neither, use a super-soft cotton cloth. Avoid using paper towels; no matter how soft they may feel to you, their fibers can scratch the tint films.
The new tint films can be cleaned much as plain glass windows: with any of the usual window cleaning solutions, with soap and water, or with a solution of dishwashing detergent. Once clean, newer films can be dried with very soft paper towels.
Some vehicle owners protect the tint, whatever its type, with a sheet of clear plastic, carefully cut to fit the window exactly. Protective window plastic is available from window-tinting shops.
Application of the plastic is exacting, but easy. (clean the tint film, as described above, and dry. Mix a solution of dishwashing detergent (3-4 squirts of detergent to a quart of water). Wet the window tint with the soapy solution. Lay the plastic over the tint film. With a squeegee, press the plastic to the tint. Working from the center to the extremities of the plastic, squeegee out any soapy water or air bubbles. In two or three days this protective tint sandwich will be dry, and the tint film will be permanently protected. Besides normal wear and tear, particular things, such as soft drinks spilled on tinted windows not protected by plastic, can deteriorate some types of tint film. So can cigarette smoke, hairspray, and a buildup of road grime. Also, too-tight window rollers and other parts of the window mechanism can squeeze unprotected tint, damaging the film.
One way to reduce damage caused by a window mechanism is to spray-coat the tint with a silicone vinyl protectant. A number of them, available at some auto supply stores and most window-tint shops, are specially formulated for "lubricating" window tint film. Lubrication makes the tint film slightly slippery, helping to reduce window mechanism damage. Lubrication also makes the film more resistant to scratching.
One additional warning: If your vehicle's windows are aftermarket-tinted with the older-type film, especially if the tint is not covered with a plastic protector, don't let the car wash people touch them. Do the tint windows gently (and with the right products) yourself. Car wash window treatment tends to be rough (the cloths they use) and tough (the pressure they use, which is seldom gentle). A single swipe with a rough cloth can leave unprotected older-type tint films permanently disfigured.
In contrast to aftermarket-tinted windows, factory-delivered tinted windows have the tint manufactured in the glass. Factory-tint windows are detailed just like ordinary plain-glass windows.
How to remove stains
Fabric upholstery falls victim to all kinds of staining agents.
The first rule is get to work on a stain agent immediately, before it has a chance to set or permanently stain. The second is, if it stains, know what to use to remove the stain best, fastest and safest.
Upholstery fabrics vary greatly. So do stains. But, generally, there is a right way and a right cleaner to handle each type of stain. While getting rid of stains is part of detailing any vehicle's interior, you should always work on stain-causing materials as soon as possible, before they permanently stain the fabric-because it may be weeks or months before you are able to do a thorough interior detailing.
Upholstery fabrics, including the popular velours, stain more easily and are harder to rid of stains than either vinyl or leather. Some pro-detailers charge more to clean auto interiors upholstered in fabric because more work is involved.
Still, you may be surprised how easily the majority of staining agents and their stains disappear from fabric upholstery when you use nothing more than warm water and even how they disappear even more easily when you use a mild "neutral" soap or a dishwashing detergent and water solution.
"Neutral" soap is soap whose pH factor (a measure of acidity or alkalinity on a scale of 0 to 14) is neither acidic nor alkaline. On the pH scale, 7 is neutral. Factor numbers higher than 7 denote increasing alkalinity: numbers lower than 7 denote increasing acidity.
Neutral detailing soaps, as other neutral detailing products, do not harm or remove paint, wax, or other detailing products. Non-neutral detailing products can. When attacking most fabric stains, try soap and water first. Only when that fails should you progress to fabric cleaners, shampoos, and other stain-removing fabric formulas. Use the mildest, least harsh cleaners first (for one example, a very mild ammonia and water solution: 4 parts water to 1 part ammonia). If that fails, dry excess moisture from the area-using paper towels or a hair dryer-and try a slightly stronger fabric cleaner.
Some stains may defy your best efforts. They never entirely fade away, no matter what techniques and cleaners you use, because the staining ingredients have penetrated and indelibly attached to the fibers of the fabric.
In some cases, what appears at first to be a simple spotting job-perhaps just a little suds or cleaner- becomes more complex. For one thing, the stain may "bleed" into the surrounding fabric. Or a ring may form that is more noticeable than the potential stain itself-and can only be gotten rid of by cleaning the entire area, perhaps a whole seatback or seat cushion.
Still, there are methods which work most often in potential stain situations common to vehicle upholstery. Almost all have a single starting point: remove the foreign material, whether it's fruit drink, chewing gum, or something you can't identify.
The removal methods, usually obvious, depend on the foreign material. Paper towels sop up and remove liquids-as blood, juice, and soft drinks. Adhesive materials-road tar and chewing gum, for example- must be scraped off using a dull knife blade. Or, better and beyond error, a stiff piece of cardboard, perhaps a folded match cover with the matches removed (on the chance they might add to the stain).
Assuming you've removed most of the foreign material-at least as much as is visible, the no-longer-visible having soaked or seeped into the fabric-try these specific stain removing methods:
Greasy or Oily Stains
Lipstick. Lipstick is among the more difficult substances to remove because it contains a variety of dyes and oil-like substances with an affinity for fabrics. Application of a quick-dry cleaning solvent-as dry-cleaning fluid (lighter fluid may also work)-may do the trick. So may various powdered fabric cleaners, available from new car dealerships and recommended for cleaning fabrics used in specific makes and models.
Should the powder-to-suds cleaners fail to eradicate stains as stubborn as lipstick, most car-makers-as well as the makers of fabric-detailing products-have available a variety of solvent-type liquid cleaners.
If the lipstick stain is small, test a tiny quarter-inch place, using a cotton swab gingerly dipped (not soaked) in a solvent cleaner. If the fluid won't work on a quarter inch of the lipstick stain, it won't work on any of it. And, frankly, you're probably stuck with the stain.
If, on the other hand, your quarter-inch solvent test significantly or completely removes the stain, use a little of the solvent cleaner on a clean cloth (a piece of cheesecloth works best). Begin at the outside of the stain and gently, without excessive pressure, work inward to the center.
Working from the outside in minimizes accumulation of fluid at the stain's outer edges and thus reduces the chance of the stain "bleeding." Even if you succeed in removing the lipstick, you may create a ring which only a thorough washing of the entire area (seat cushion or seatback) will wholly remove.
Crayons (wax). Wax-type crayon stains are removed much like lipstick.
Oil, grease, butter, margarine, vegetable oil, cosmetic creams. After you have scraped off or otherwise removed the residue, blot lightly with a clean paper towel, taking up the remaining visible residue. Then use a solvent-type fabric cleaner as in "Lipstick," above, carefully working from the outside in. After each solvent application, blot with a clean paper towel. Continue the removal treatment until the visible stain is gone and no more stain is picked up by the blotter.
Road tar and asphalt. These two are difficult to remove and even harder to prevent from permanently staining fabric. One problem: the solvent-type fabric cleaner, which is used on these substances as for "lipstick," dissolves tar and asphalt, risking "bleeding" into adjacent areas. One way to prevent or minimize bleeding is to blot frequently as you work, blotting up with clean paper towels any tar or asphalt dissolved by the cleaner.
Chewing gum. Generally, removing the gum itself solves the problem, unless it's colorful bubble gum, which can stain unless promptly treated. First, use ice cubes to harden the gum. Then as the gum hardens, scrape it from the fabric with a dull knife. A little solvent-type fabric cleaner makes the process easier and, used ahead of your knife and after it, usually removes all gum remnants.
Shoe polish (wax and paste types; see "Water-soluble inks and polishes," below). The procedure described above under "Lipstick" usually works for wax and paste shoe polishes.
Coffee (with cream). The procedure for removing coffee with cream is similar to that described above under "Lipstick" -- with some differences. Coffee stains generally cover more fabric area because more substance is usually spilled-say, half a cup of coffee rather than merely a dab of lipstick or a wad of chewing gum. After the solvent/cleaner procedure and a thorough blotting of the last lingering evidence of the cream-laden coffee spill, a ring is often visible. In that case, the entire seat or seatback must be scrubbed with a mild soap solution, blotted, rinsed with clean lukewarm water, and then blotted some more. Finally, the area should be spot-dried with a hair dryer (some plug into the vehicle's cigarette lighter; use an extension cord if yours does not).
When using a hair dryer, hold the nozzle far enough from the fabric to prevent scorching. To test the dryer's heat, lay your hand flat on the fabric and turn on the dryer. Increase the nozzle's distance until you feel heat, but not extreme heat, on your hand. Slower drying is better than permanently disfigured fabric.
Non-Greasy Stains
Scrape or blot away the non-greasy residue. Sponge the area with cool water, then blot semi-dry with clean paper towels. If the stain disappears without leaving a ring, carefully dry the still-moist area with a hair dryer (as noted above, some plug into the vehicle's cigarette lighter; if yours does not, use an extension cord).
If remnants of the stain (or its odor) remain, one of the two procedures outlined below can probably help, depending on the non greasy substance (as discussed on the following pages):
Use a foam-type fabric cleaner such as those available at some dealerships. Mixed with water, as directed on the label, the powder cleanser produces a suds-like foam. Using a clean sponge, spread the suds over the stain area. Don't rub vigorously or saturate the fabric.
When the stain disappears, remove surplus suds with the sponge, then rinse with a clean sponge and water. Wipe up and blot any remaining moisture with a slightly damp paper towel. Immediately dry with a moderate heat source: heat lamp, hair dryer, or air hose. Finally, merge the treated place and surrounding fabric by rubbing gently over the entire fabric area with a clean, slightly dampened soft cloth.
Some spray-on upholstery cleaner/protectors formulated for de-staining cloth or velour auto fabric deposit a fabric protector after the stain has been removed.
Use mild neutral soap or dishwashing detergent and water, followed, if necessary, by judicious use of cleaning fluid or a solvent-type cleaner/spot lifter. Blot the stain with paper towels and dry with a hair dryer or other gentle heat or air source.
Although you have removed the stain, an odor may linger (particularly if the stain was from urine or vomit). If so, after blotting up most of the moisture, and before final forced-heat or air drying, apply a deodorizing mix of baking soda and warm (not hot) water (for example, 1 teaspoon of baking soda mixed in 1 cup of lukewarm water). Apply the mix with a sponge and allow it to remain on the affected area for about a minute. Wipe up the residue with a clean sponge moistened slightly with water. Repeat if necessary. Then rinse the area using a sponge and warm water, blot up excess moisture, and apply heat to dry.
Ammonia and water acts as both an odor-destroyer and acid neutralizer, especially on urine stains. The mix: 5 parts water and 1 part household (colorless) ammonia. Avoid lemon-scented ammonia because of its color.
Coffee (black).Use a foam-type cleaner, as described above, with lukewarm water. Unless coffee is the heavy-residue "Turkish" type, follow directions above. Either procedure should remove black coffee stains.
Catsup. Gently rub stain with cold water. Use neutral soap or dishwashing detergent, if necessary. Be sure your cloth is clean. Keep switching to a clean place on the cloth rather than wiping over the stain place with a catsup-stained section. When the stain is removed, blot and air or heat dry.
Mustard. Mustard produces one of the harder stains to get rid of because its usually intense color acts like a dye. First, scrape off the residue; then sponge the stain with warm water. Use neutral soap or dish-washing detergent for the most stubborn mustard stains. Blot dry.
Fruit juice, soft drinks, wine, fruit, egg. Treatment for all of these non greasy stains is similar. Remove by following directions for using a foam-type fabric cleaner, above. Do not use soap and water, which may set the stain. If the foam cleaner does not remove all the stain, you may also need to use a solvent-type cleaner. Red wine stains, like those from colored soft drinks and egg yolk, are obviously more troublesome and time-consuming to remove than, say, white wine or colorless soft drink stains. Intensely colored stains in this group may need to be treated with a solvent-type cleaner in order to get them to do a total disappearance act.
Urine. Sponge with a lukewarm suds mix (water and suds), then rinse in cold water. Follow this with an ammonia/water mix, applied with a sponge or clean cloth. Let the ammonia and water (see mix formula directions for using mild neutral soap, above) "work" on the stain place for at least one minute. Finally, rinse with a clean, water-wetted cloth or sponge. Blot and heat dry.
Vomit. Vomit sometimes produces a nasty, hard-to-remove stain. After removing residue, sponge with cold water. Follow with a mild soap and warm water wash. Then apply the deodorizing baking soda/water mix (see mix formula directions, above). Conclude with a cold-water sponge rinse. If any stain remains, use a solvent-type cleaner or cleaning fluid. Finally, use a sponge to rinse with cold water, then blot and air/heat dry.
Blood. Do not use soap or hot water on blood. They will set the stain, perhaps permanently. Use nothing but cold water. Soak and rub the area with a clean cloth or sponge soaked in cold water. Keep turning the cloth to a clean place and use clean cold water each time. When the stain is removed, blot and dry.
Combination stains
Ice cream. As you might suppose, chocolate ice cream stains are harder to remove than vanilla and other less colorful ice creams. Apply hot water on a clean cloth. If stain persists, wash with a warm neutral soap suds solution, followed by a cold, clean water rinse. Dry or let dry. Any remaining stain can usually be gotten rid of with a few dabs of solvent-type cleaner.
Candy (non-chocolate).Rub gently with a clean cloth soaked in hot water. Let dry. Any remaining stain can be erased with gentle dabs of cleaning fluid, using a clean cloth.
Candy (chocolate). Use the same stain-obliterating technique described for non-chocolate candy. In the final cleaning fluid step, continue applying the fluid and blotting with paper towels or an absorbent dry cloth until all stain remnants are blotted up.
Stains from unknown source.Clean with cool water, blot, and dry. Solvent-type cleaner, applied after stain area dries, will usually remove any remaining stain.
Ballpoint pen ink.Stains produced by a ballpoint pen are among the most difficult to remove from auto upholstery (or any other kind of fabric). Sponge-wet with cool water, then with cool water and detergent; follow with a cool water rinse. Persistent ballpoint marks can sometimes be removed with rubbing alcohol applied with a damp, clean cloth.
If that fails, try a solvent-type cleaning fluid. The risk with ballpoint marks is that the ink, liquefied by the various treatment liquids, will spread to the adjacent fabric. One way to minimize potential spreading is by blotting thoroughly (using super-absorbent paper towels) after each application of water, alcohol, or cleaning fluid.
Sometimes all techniques fail, and the fabric is indelibly ink-stained. Much depends on the type of ink.
Water-soluble inks and polishes. Some inks and a few polishes are water-soluble, and they disappear with only a careful cool water treatment, followed by blotting and air or forced drying.
By contrast, ball pens or markers that use indelible ink may, whatever your treatment, stain indelibly.
Today's auto fabrics are often sprayed at the factory with a water-and oil-repellent protectant. Once a fabric stain area is thoroughly dry (seldom in less than a day's time, longer in humid weather and regardless of apparent surface drying by heat or air), renew its factory protection with a quick spray application of a good fabric protector.
Repairing seats and dash
Vinyl dashboards and seats are subject to cracking and tearing with hard use. Wear and tear in these areas is very noticeable, but not too difficult to repair. Cloth-covered seats are harder to repair, unless you're handy with a tailor's needle and thread. If you're not and the seams are coming apart, invest in a set of seat covers in lieu of a trip to the upholstery shop.
Any retail auto store sells pre-fitted seat covers at a fraction of the cost of new upholstery. Seat covers are sold as "fits-all" (universal application), or more expensively by make and model of vehicle. Be sure to check if the covers fit bench, bucket or split-back seats. The covers are tied or wired under the seats.
Burn marks in vinyl seats; armrests and dashboards can be repaired with the help of a good vinyl repair kit. Rips in the vinyl and seams that have come apart are slightly more difficult but are well worth the time and effort in the end.
About the best way to repair a rip is to heat both sides of the tear with a hair drier. Lift up the material and place a 2" wide strip of fabric tape under one side of the vinyl. Stretch the other side over the tape and line it up carefully. When you have it lined up, press down. Hold it in place while someone applies vinyl repair liquid over the area to be repaired. Let it dry completely before using it. The repair should look like new and last quite a while.
Other methods of repairing vinyl involve vinyl repair compounds that require heat. The kits contain a repair compound, applicator and several different graining papers. If the hole is deep, it will have to be filled with foam or anything to provide a backing. Spread the vinyl patch compound over the blemish. Select a graining paper to closely match the grain of your material and place it over the patch, grain side down. Heat it with an iron set at COTTON for about 60 seconds. DO NOT LET THE IRON CONTACT THE VINYL. The result should be a long lasting and nearly invisible repair.
Repairing door panels
It's easy to fix door panels. Treat them the same way you would a vinyl seat. The panels are usually fastened to the door with clips behind the panel. If these won't hold any more, screw or glue the panel in place.
Figure 17 A few sharp
raps with your fist will usually snap a door panel back into
place.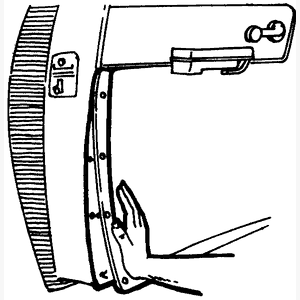
|
Figure 18 If the clips are sprung, drill some
small holes where the panel is pulled away and install some
screws with counter-sunk washers.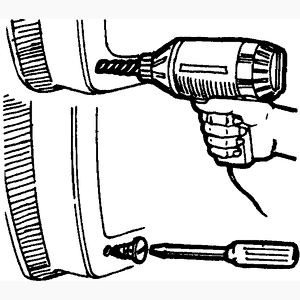
|
Figure 19 If drilling holes and screws is not
practical, use one of the super-strength glues available.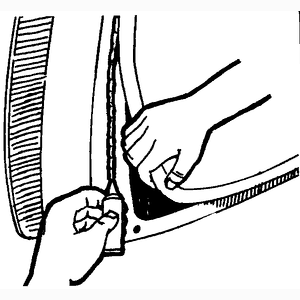
|
Figure 20 Use screws and countersunk washers
to attach door panels.
|
Figure 21 Door panels are usually retained by
screws...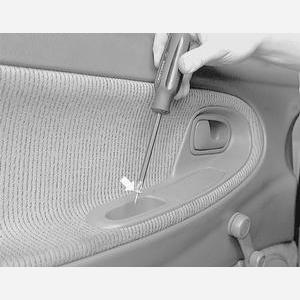
|
Figure 22 ...and by snap fasteners.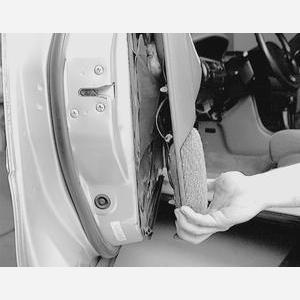
|
Keeping the interior clean
Once you've gone to the trouble of cleaning the interior, it'll be worth your while to keep it clean. It makes it much easier to clean up the next time around.
Common sense plus these tips will help keep the interior clean.
Vacuum the carpets regularly. The hardest thing to get out of carpets is ground-in dirt.
- If you don't have floor mats, invest in a set. They are much cheaper to replace than carpets and take a lot of the wear carpets would normally get. Don't be too heavy handed with waxes, polishes and dressings. Too much build-up of wax and polish only traps more dirt.
- Don't use dressings or wax on dirty vinyl. Spend a little time to clean it properly before applying a vinyl dressing.
- A combination cleaner/protectant or saddle soap used on vinyl will keep it soft and pliable but will make the seats slippery. A good buffing with a soft cloth will reduce the slippery feeling.
- If your fabric upholstery is new and clean, Scotch-Guard& will keep stains from setting in the fabric and make them easier to clean. However, if the fabric is already dirty or old, you're only wasting your time.
- If possible, park your vehicle in the shade. If you can't park in the shade, at least cover the seat back and dash if they will be in the sun's rays.
- Clean spots and stains as quickly as possible before they have a chance to set in the material. You stand a better chance of completely removing the stain if you remove it while it's wet.
 |
 |
 |
| Return to our page on Automotive Articles | Return to Index Page | Email us now at thai4x4@gmail.com |
FYI, Per Statcounter
you are the
-th visitor to our site since the beginning of
this year.
© 2002-2009 :: Sam Automotive Group :: All rights reserved :: Email: thai4x4@gmail.com ::